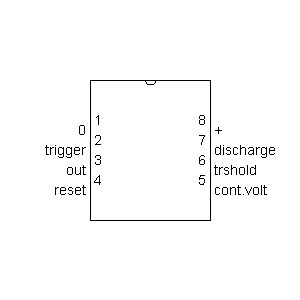
555 Timer Schematic Symbol - 555 Timer Pinout Voltage Controlled Oscillator Basic Electronic Circuits Timer / As we mentioned above, adding junctions to your schematic allows intersecting nets to share an electrical connection.
555 Timer Schematic Symbol - 555 Timer Pinout Voltage Controlled Oscillator Basic Electronic Circuits Timer / As we mentioned above, adding junctions to your schematic allows intersecting nets to share an electrical connection.. The notations are all the same. Electronic symbols are very essential to know while designing circuits for a project or while making a pcb for a project. There are six pins from the set of digital pins that are pwm (pulse width modulation) pins. As we mentioned above, adding junctions to your schematic allows intersecting nets to share an electrical connection. Here this article discusses most of the circuit symbols of electronic components and their functions.
If we don't know the symbols of the schematic circuit, it is extremely hard to create a project. The editor is fairly straightforward and has tons of hotkeys associated with it to make it easy when creating a component with several pins. Same as adding the schematic, just add a schlib to the project and watch it fall underneath "libraries" inside your project. A type of variable capacitor is the trimmer capacitor that is small in size. The notations are all the same.
Simple Dc To Dc Converter Using 555 Time Ic 6v To 35 Volts Boost Converter from i2.wp.com The editor is fairly straightforward and has tons of hotkeys associated with it to make it easy when creating a component with several pins. To add a junction, you can do it in one of two ways: Nov 23, 2020 · if you look closely, you will find the '.' symbol on digital pin 3,5,6,9,10, and 11. In this example, the brighter the light, the lower the resistance. This will require a junction. If we don't know the symbols of the schematic circuit, it is extremely hard to create a project. They are numbered as d3, d5, d6, d9, d10, and d11. We cannot get resistance directly but we can find it by calculating the voltage.
We cannot get resistance directly but we can find it by calculating the voltage.
As we mentioned above, adding junctions to your schematic allows intersecting nets to share an electrical connection. Capacitor can be used in a timer circuit by adding a resistor. Jul 27, 2012 · close the switch to start the timer. The bottom resistance remains constant. The following schematic shows two additions to the basic 555 timer circuit. This will switch the led off and start the timer. Try using a different value capacitor in the circuit to see the time period change. This will require a junction. We cannot get resistance directly but we can find it by calculating the voltage. They are numbered as d3, d5, d6, d9, d10, and d11. After the timer has finished timing or timed out, the led will switch on again. There is no 555 timer though, so let's create our own. A type of variable capacitor is the trimmer capacitor that is small in size.
Same as adding the schematic, just add a schlib to the project and watch it fall underneath "libraries" inside your project. One reduces the trigger sensitivity and the other will double the output pulse duration without increasing the values of r1 and c1. These tools allow students, hobbyists, and professional engineers to design and analyze analog and digital systems before ever building a prototype. This will switch the led off and start the timer. The notations are all the same.
How To Design And Simulate Circuits Using Tinkercad Beginner Level Fully Electronics from fullyelectronics.com Here this article discusses most of the circuit symbols of electronic components and their functions. After the timer has finished timing or timed out, the led will switch on again. Capacitor can be used in a timer circuit by adding a resistor. In this example, the brighter the light, the lower the resistance. There is no 555 timer though, so let's create our own. The notations are all the same. This will require a junction. The editor is fairly straightforward and has tons of hotkeys associated with it to make it easy when creating a component with several pins.
Same as adding the schematic, just add a schlib to the project and watch it fall underneath "libraries" inside your project.
This will switch the led off and start the timer. Connect the switch link (red link in the photo) to the bottom rail. We need to add a net that connects between pin 3 on our 555 timer and our r3 and r4 resistors. It consists of a length material whose resistance changes according to the light level. Same as adding the schematic, just add a schlib to the project and watch it fall underneath "libraries" inside your project. As we mentioned above, adding junctions to your schematic allows intersecting nets to share an electrical connection. The bottom resistance remains constant. There is no 555 timer though, so let's create our own. This will require a junction. We cannot get resistance directly but we can find it by calculating the voltage. Used to vary the capacitance by turning the knob. They are numbered as d3, d5, d6, d9, d10, and d11. Electronic symbols are very essential to know while designing circuits for a project or while making a pcb for a project.
This will switch the led off and start the timer. These tools allow students, hobbyists, and professional engineers to design and analyze analog and digital systems before ever building a prototype. As we mentioned above, adding junctions to your schematic allows intersecting nets to share an electrical connection. The following schematic shows two additions to the basic 555 timer circuit. Nov 23, 2020 · if you look closely, you will find the '.' symbol on digital pin 3,5,6,9,10, and 11.
555 from gallery.proficad.com Electronic symbols are very essential to know while designing circuits for a project or while making a pcb for a project. The following schematic shows two additions to the basic 555 timer circuit. They are numbered as d3, d5, d6, d9, d10, and d11. Connect the switch link (red link in the photo) to the bottom rail. We cannot get resistance directly but we can find it by calculating the voltage. In this example, the brighter the light, the lower the resistance. This will switch the led off and start the timer. The notations are all the same.
As we mentioned above, adding junctions to your schematic allows intersecting nets to share an electrical connection.
Connect the switch link (red link in the photo) to the bottom rail. This will require a junction. Nov 23, 2020 · if you look closely, you will find the '.' symbol on digital pin 3,5,6,9,10, and 11. To add a junction, you can do it in one of two ways: We cannot get resistance directly but we can find it by calculating the voltage. Here this article discusses most of the circuit symbols of electronic components and their functions. There are six pins from the set of digital pins that are pwm (pulse width modulation) pins. The bottom resistance remains constant. Used to vary the capacitance by turning the knob. The following schematic shows two additions to the basic 555 timer circuit. One reduces the trigger sensitivity and the other will double the output pulse duration without increasing the values of r1 and c1. We need to add a net that connects between pin 3 on our 555 timer and our r3 and r4 resistors. A type of variable capacitor is the trimmer capacitor that is small in size.
Electronic symbols are very essential to know while designing circuits for a project or while making a pcb for a project 555 timer schematic. It consists of a length material whose resistance changes according to the light level.


0 Komentar